|
|
|
Dice Coach & Instructors / Newsletter / Contact / Home
|
|
|
Current
Practice…Future Profitability
Part VII I
had a ton of help from our friend HSC III in preparing this article. In actual fact, he did all the work and I
had all the fun. While he was
fine-tuning the difficult technical aspects of it, I was sitting back merely thinking
about the best way to describe how to do it. I
needn’t have worried; in the end, he did all of that too. As
for my part, well let’s see, I did say that he had a spectacular idea in the
first place and I did suggest that he expand upon it since it was such a good
practice-session proposal, and I did help rewrite a sentence or two. Oh, and I also was the one who suggested that we
use brighter contrast pictures in this article. So
yeah, I’ll take full and unfettered credit…but only for
encouraging HSC III to develop his excellent idea into what you see here.
HSC III’s Laser-Practice…Laser-Perfection HSC III: Based
on some feedback I got after a Message Board post regarding the use a laser-level as a
practice tool, I continued to develop the idea into a series of practice exercises. The
ideas, as well as a large degree of guidance, came directly from the Mad Professor
particularly where he challenges us to make sure our basic toss is technically sound above
all other considerations. When I read Shooting Bible
- 9, I was struck by the phrase, “To
get consistency, you have to de-engineer your toss”. To de-engineer your toss, you have to look at
each individual aspect of it (from the time you first touch the dice to arrange
them…until you finally release them at the end of your toss-motion). That way, you can isolate each component and
break it into separately perfectible pieces.
Ø
If you work on each element at its most basic
level, you’ll be in a better position to understand how to interpret the results of
each practice-toss outcome.
Ø
When you take that newly learned skill to a
real-world casino, you are better prepared in terms of understanding what each of your
dice-outcomes is indicating, and you are better equipped in terms of making
adjustments to the indicated needs of your toss-dynamics.
Ø
That approach gives you the ability to make the
required adjustments to the specific toss-motion element that is most likely the
cause of the problem.
Ø
For instance, it makes no sense to start
playing around with all kinds of different trajectories and landing-speed alterations if
the actual problem is sourced back to a grip-pressure or finger-alignment
shortcoming…yet you’d be surprised at how many aspiring shooters try to fix
something that ISN’T broken, simply because they are unable to isolate the
true source of the problem. HSC III: For
example, if you are trying to throw a rock across the street and the first time you try,
the rock only makes it three-quarters of the way there; then it’s not very
complicated to make the necessary adjustment on your next throw, or the one after that
until you apply enough energy to get the rock to go where you want it to go. MP:
That’s right.
A successfully repeatable dice throw combines a properly balanced grip with
the right release-angle and speed so that the dice hit your target-area with the proper
amount of descent-speed and axial-spin that will see them land squarely to each other (and
to the table itself). From there you want
both dice to squarely hit the backwall with the same forward-speed and the same rotational-speed
so that each die stays in phase with the other. Now if the dice are doing all those things
correctly, but they are rebounding way too hard and having a tendency to hit something
simply because they travel so far back; then it’s silly to start adjusting your
grip-pressure or spin-rate. Clearly neither
of those two things is the problem. Instead,
the same throw with slightly less throwing-energy should see the dice do everything you
want them to do, but without the long-distance rollback that you want to eliminate. HSC III: When
you are a beginner, it’s pretty hard to adjust the forward energy, the backspin, the
trajectory, and the release point, all while keeping the dice level and straight from one
throw to the next. But if you break a big
complex process down and look at the nominal requirements of the smallest individual
parts, it will serve you well when it comes time to putting a consistently repeatable
throw together.
Ø
Practicing each component at its most elemental
level lets you build proper muscle-memory that is strong and correct right from the
start.
Ø
Equally, it also lets you correct some of those
long-term double-pitch and off-axis problems that have plagued many shooters for years.
Ø
The stronger your toss-dynamic foundation; the
more consistently repeatable your skill-set becomes. Why Use a
Laser-Level?
So how does using a Laser-level during your
practice-session help you to accomplish all of that?
Ø
It keeps the forward-motion of your hand in
perfect alignment.
Ø
It keeps the dice in perfect alignment with the
longitudinal plane of the table surface.
Ø
It ensures that your dice-release is
technically flawless and has not been negatively affected by any stance, body-positioning,
or major muscle-group movements that immediately precede your release.
Ø
It ensures that the same amount of
backspin-inducement is imparted on each and every toss that you make. The
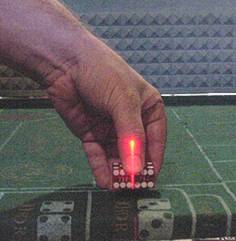
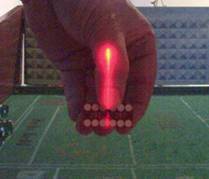
Laser-Level
HSC
III: I
started out using a laser-pointer, but then I remembered that I had one of those $15.99 “As seen on TV
Laser Straight” devices. It emits a
red-light line, and also has two leveler bubble-indicators which are quite helpful since
you are going to aim the beam so that it is perfectly aligned to your practice-rig’s
deck and backwall.
Ø
As was mentioned in Part Six
of this series, it is critical that you first level the deck and square-up the backwall of
your Practice-Rig; otherwise you’ll be making all kinds of unnecessary grip-alignment
and toss-motion adjustments that will not be useable on the perfectly balanced real-world
tables.
Ø
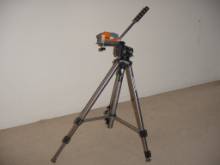
To have maximum flexibility in positioning the
laser, you should consider using a tripod like pictured below. Using a tripod lets you set
the laser at various heights and angles, which allow you to vary the total length of the
line the laser emits. The longer the line, the more it will be visible for the full range
of motion in your toss.
MP: HSC III purchased his practice rig from Dixie. He shoots left-handed from stick-right (SR) and is
a bit taller than six-feet. He uses a 3-finger top-diagonal grip, and keeps his feet
evenly spaced and weighted, with his knees slightly bent. I mention all of this to
give you an idea of how he is positioning himself, but frankly all of the concepts that we
are discussing here can be directly transferred to your own shooting dynamics even if you
are a 5’-5” right-handed SL-shooter who uses a four-finger front grip. The principal and the benefits remain the same. A Word of
Caution
Lasers can be dangerous tools if misused and
can cause serious eye injury if used carelessly or incorrectly.
Ø
Never look directly into the laser.
Ø
Take care when people are approaching your
practice area and the laser is on.
Ø
Completely read the Owners Manual and follow
its safety instructions. When you are initially setting up the laser,
try to limit the amount of time that it is actually turned on. Then once it is properly set up and aligned, you
can roughly pre-set several pairs of dice on your throwing-station so that you can toss
each set, one right after the other. That
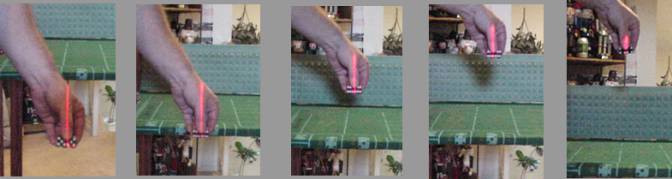
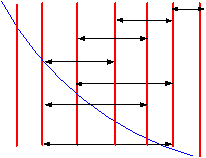
minimizes the amount of time that the laser needs to be on. Laser Alignment HSC III: Take a look at how
the laser can track the full range of your throwing-motion throughout its entire range. The picture series
below shows the starting point of the toss, while each subsequent picture shows the
throwing-motion as the arm is extended down-table. In
that process, the laser ensures that the dice start out straight and parallel to the
backwall and level with the deck…and remains that way for the duration of your
pre-release motion. As the dice move
further away from the laser, there will be less light focused on your hand. What is important to note, is that your hand (and
the dice) stay in perfect alignment during their entire throwing-motion arc.
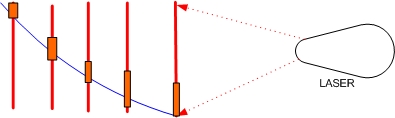
Ø
A Laser-Level emits a red solid line that is
represented by the 5 instances of vertical red lines in this diagram.
Ø
The motion of your arm as it moves from its
starting position at the right-most lowest point, up until you release the dice at the
left-most highest point, is represented by the blue arcing line; that is your toss-motion
arc.
Ø
Now clearly a higher-trajectory motion would
see an even steeper arc, while a Low, Slow & Easy release would see a
much lower arc. Again, the principal and the
benefits remain the same. Equally too, if you
are shooting from stick-left (SL); then this diagram would be reversed.
Ø
You’ll also notice that the right-most
section of red line in the diagram represents how big and bright the laser-line will
reflect on your shooting-hand. The closer
your hand is to the laser-light source, the more it will illuminate your hand and wrist.
As you approach the release-point of your toss-motion and your hand moves further away
from the laser source; then the light-contact area becomes smaller. MP: The goal is simple. As your hand goes
through its full toss-motion arc, you want to keep the perfectly-vertical laser focused on
the same part of your hand, with its red line staying centered as consistently as
possible. Ideally, the line should intersect the
seam between the two dice. You may be stunned
to discover just how much sideways wiggling, jiggling and wavering the dice actually go
through during their pre-release toss-motion arc. This
exercise helps you develop a smooth and laser-beam straight toss-motion. These pictures capture the complete range of
the tossing-motion.
How Do You Eat
An Elephant?
To a non-practitioner of dice-influencing, the
process of throwing the dice looks pretty simple. It’s
only when you take up the practice of Precision-Shooting that you realize that it’s a
lot more complicated than it looks. So how do you eat an elephant, and how do you
master such a complicated task? You simply slice it up into nice bit-sized
digestible pieces. HSC III: I
spend a lot of practice-session time on repetitive-motions within a very small
arc-of-movement. That is, I take a detailed
look at what each of my muscles are doing during each movement within the toss-motion
itself. MP:
That’s actually a good idea. It
enables you to check your grip-pressure and finger-alignment at every phase of the toss. You’d be amazed at the number of tosses that
start out being perfect, but by the time the dice are just about to be released, they are
far from being in ideal shape. That’s
because various movements and grip-pressure variations during the short-lived toss-motion
will impart all kinds of off-axis inducing changes. Sometimes
that negative influence is overt and obvious, but sometimes it’s latent and truly
hard to detect. The best way to figure out if
it is indeed happening you; is to look at each element of your toss in the tiniest of
detail at each phase of the toss-motion arc. You
may be amazed at what you find. By breaking the overall toss-motion process
down into its most elemental components, you give yourself a proper chance to construct a
better-built and consistently repeatable de-randomized dice-toss. Your
Pre-Release Arc May Need Improvement
MP:
One of the reasons the laser idea works so well, is because it often
uncovers slight defects that you wouldn’t normally see with the unaided eye.
Ø
For example, when you line up the dice towards
the backwall, even if you are using a reference point like the Pass-line stripe for your
shooting-lane; your toss-motion may wobble and waver during its pre-release arc-path.
Ø
This is also the time when your initially
perfectly-aligned dice-set tends to fall out of alignment due to changes in the
positioning and movement of one or more of your major muscle-groups.
Ø
The same thing can happen with your hand, wrist
and finger-alignment too. As you go through
your pre-release toss-motion arc, different muscle-groups have a tendency to bend, twist
and hook in one direction or the other.
Ø
So your toss may start out
perfectly aligned, but somewhere along the pre-release toss-arc…it goes awry. In many cases, a slight wrist-twist or an
unbalanced grip-alignment may not even be detectable without the aid of a laser-level. HSC III: The
arrows in the diagram below shows one way the total arc of your forward motion can be
segmented and practiced by moving back and forth within very small segments of your
toss-motion arc…all the while keeping your throwing-arc and dice-squareness in
perfect alignment. This is also valuable for muscle-memory training because the laser
provides rock solid visual feedback that tells you whether or not your toss-motion reps
are in correct form and proper alignment.
This
diagram shows each of the shortened ranges you can use (by going back and forth within
your toss-motion arc) to explore how aligned your wrist, hand, fingers and dice actually
are during a particular spot in the pre-release process.
The laser gives you a visual point of reference
so that you can be absolutely certain whether or not your wrist, hand, fingers and DICE
are staying on a perfectly aligned course. MP: One word of caution though. The more “unnatural”
your throwing-stance or toss-motion is; the more stress, strain and fatigue your muscles
are going to feel. Though we’ve covered
natural throwing-positions and the elimination of major-muscle/minor-muscle conflicts in
the Shooting
Bible series; regardless of the throwing-motion that you use, it is
important that you stop and let your muscle relax if you start to feel any pain or strain,
before resuming this exercise. HSC III: Breaking
your toss-motion into separate segments really builds your muscle memory with the type of
repetitive work that is as good as it can get. While you are doing the segment-training as
well as the full-arc movement; you can also vary your toss-motion speed, although
you’ll likely find that the slower you, go the jerkier your toss-motion becomes. MP:
Though it’s true that you’ll experience a lot of non-aligned movement
when you slow your toss-motion down to an absolute minimum (so that it looks like one of
those stop-action claymation Pokey & Gumby cartoons); the benefit of doing so
is that it helps you to train for those lively tables that have bouncy trampoline-like
layouts. Excess-speed can kill even the most perfectly
aligned on-axis toss simply because the excess throwing-energy hasn’t properly
decayed (slowed down) by the time both dice hit the backwall. By going through this slow-motion exercise and
learning how to dial down your throwing-force, you’ll be surprised to learn that you
can end up with even more axial-control and facial-correlation that easily
tames even the most difficult table-surfaces. Release-Point
Alignment
HSC III: We next have to focus on the release-point alignment of
our toss.
Ø
Extend your arm in its natural throwing-motion
arc. When you reach the release-point, just
stop your forward-motion and hold it for a second or two to observe what the laser is
indicating.
Ø
What is the position of the dice in your hand
at that moment, and how square are they to the deck and to the backwall?
Ø
You’ll often discover that your
forward-motion arc is perfectly straight, but the dice are tilted in relation to the table
surface.
Ø
Further, you may learn that the plane between
the two dice is no longer flat to each other and they have somehow slipped out of
alignment. In either case, an on-axis outcome
from this release-point position would be in serious jeopardy.
Ø
To overcome that, repeat the same toss-motion
arc and release-point alignment-inspection over and over again. Try it while using different toss-motion speeds
until you get a highly reliable, highly repeatable degree of consistency. The Dice Drop MP:
I initially HATED this particular part of HSC III’s idea because it
appeared to mimic the random dice-drop experiments that have been conducted by naysayers
over the last number of centuries to “prove” that dice-influencing couldn’t
or wouldn’t work. In fact, that ancient
ill-conceived idea is still sited today by people who should know better. However, I changed my outlook towards HSC
III’s version of it when I saw the sheer utility of his idea. HSC III: I
do the “Dice Drop” step of this exercise by standing as close to my practice rig
as I can while still allowing the full range of motion for my throwing arm.
Ø
When I get to the throwing-motion
release-point, instead of stopping, I now simply release the dice by just dropping them
straight down.
Ø
A straight drop is exactly what I’m
looking for and the dice should stay perfectly together and fall straight down to the
table.
Ø
There should zero, or as little as possible,
forward-energy during the stop-action portion of the exercise and barely any of it during
the ultra slow-motion parts. You do not want
to be adding any spin at this point.
Ø
If one die looks like it is falling
faster than the other, then it means that they were probably released at different times. You have to work on this process until both dice
release from your grip at exactly the same time. MP: The
object of this exercise is to determine whether you are releasing both dice at exactly the
same time and to ensure that all of your fingers are imparting the same influence as the
others (including your thumb). Ø If both dice are released at the same time, but are not in perfect alignment with (square to) the table surface; then your release position might be off or one or more of your fingers may be inducing more influence than the others.
Ø
Similarly, if there is a grip-pressure variance
between one or more of your fingers or your thumb, then obviously that is going to impart
all kinds of undue influence when the dice leave your hand.
As a result, each die will either leave your hand at a slightly different
time, or their facial-orientation will be different.
For example, if one die is falling without any spin, yet the other one is
turning on its axis; then one or more of your fingers have induced that release-point
disparity.
HSC III: You also need to ensure that you are not introducing
any type of extra movement that would not naturally be part of your tossing motion.
Ø
For example, make sure that you aren’t
unintentionally adding any abrupt movements or dropping the dice from a higher
release-point than you would in actual casino play.
Ø
To achieve roll-after-roll consistency, the
synchronization of the dice-release between your fingers and your thumb has to be perfect.
Equally, the synchronization between each of your fingers (if you are using more than one)
also has to be perfect.
Ø
You’ll want all of your fingers working in
flawlessly coordinated harmony to ensure a perfectly-timed all-fingers-at-once release. I don’t even look at the dice when I first
use this dice-drop exercise. Instead, I just
focus inward on perfect dice-release synchronization.
It is important to understand that I am not
concerned with the behavior of the dice once they make contact with the table. The resultant dice-outcomes from a vertical
dice-drop exercise are totally meaningless. Instead, this exercise is designed to train you
to release the dice in perfect coordination at the far end of your toss-motion arc. All
I care about is making the release-event as “clean” and perfectly synchronized
as possible. Putting It All
Together
To this point, most of our focus has been on
the separate small-scale elements of our toss-motion.
Now it’s time to put it all together into a complete and cohesive
on-axis facially-coordinated throw. HSC III: This
is where the full benefit of using a laser-level during your practice session really
shines through. By first dealing with the
individual-component complexities of your toss and seeing how each toss-element is
interdependent on the other, we get a better understanding of how to make alignment
adjustments when we are in a casino. Look at each dice-landing…
Ø
Are the dice running to the left or right when
they hit they table? Then check the level of
your wrist, hand, fingers and dice at your release-point.
Ø
Are the dice separating in mid-air with one die
ahead of the other? Then go back and focus on
making a coordinated and synchronized release. I build and measure my success in very small
steps. After I get one “perfectly perfect” toss; I then try to
get two in a row…then three in a row, and so on.
I check and recheck the perfect alignment of EVERYTHING and only make little
adjustments where necessary.
Ø
Again, this repetitive routine helps builds
correct muscle-memory and muscle-control.
Ø
I work on getting all aspects of perfect
dice-alignment, perfect toss-motion, perfect dice-release, and perfect landing. If I’ve done everything right; then I get
perfect on-axis primary-face results.
Ø
If things start to go funky, it’s simply a
matter of stopping for a minute to go back through each of the steps and elements that
constitute a perfect throwing-motion and dice-release.
MP:
Well that’s exactly why HSC III’s Laser Practice…Laser
Perfection idea is so useful. The laser device itself is merely an aid, but
the PROCESS of actually breaking your toss-motion alignment and dice-release
equilibrium down to its most fundamental elements is where you really derive the greatest
benefits. Of even more benefit is how this all relates
directly to real-world casino play in that it enables you to confidently make the
necessary subtle dice-alignment and toss-motion adjustments when your money is actually on
the line simply because you already know exactly what will work and precisely how much or
how little re-alignment input you’ll have to make to get there. I’ll also add that this same exercise can
be used to learn how to shoot consistently from various throwing-positions around the
table. Instead of being discouraged if your
favorite table-position is already occupied; through this exercise, you can simply move to
an entirely different spot that you’ve also mastered with a perfectly aligned
toss-motion.
Ø
The laser gives you a way to check the
alignment of your toss-motion and dice-grip at any pre-release point.
Ø
It trains you to keep the forward-motion of
your wrist, hand, fingers and dice in perfect alignment at all times.
Ø
It keeps the dice in perfect alignment with the
longitudinal plane of the table surface.
Ø
It ensures that your dice-release is
technically flawless and has not been negatively affected by any stance, body-positioning,
or major muscle-group movements that immediately precede your release.
MP: I want to thank HSC III for sharing all of this very
useful material with us. I hope it helps your
game as much as it has for those of us who have already used his Laser
Practice…Laser Perfection idea. Good
Luck & Good Skill at the Tables…and in Life. Sincerely, The
Mad Professor
|
|